Welcome to the complete guide to distribution certificates, .p12 files, and provisioning profiles on iOS! Publishing and distributing apps on the Apple App Store requires a number of steps and technical requirements. These include creating a distribution certificate, a .p12 file, and a valid provisioning profile.
If you’re an iOS developer or trying to publish and distribute your first app on the App Store, this guide is for you. We’ll explain how to create and use each of these essentials in a detailed, easy-to-follow way.
Let’s start!
What you need to know
The steps below will guide you through the process of creating an iOS distribution certificate and .p12 file.
- A distribution certificate identifies your team/organization within a distribution provisioning profile and allows you to submit your app to the Apple App Store.
- A .p12 file contains the certificates that Apple needs to create and publish apps.
- A provisioning profile is a collection of information that links an application ID to signing certificates and authorized devices. It is used to control and authorize the devices on which the application can run and the Apple services that it can access (such as iCloud or In-App Payment).
We will also be using
- A CertificateSigningRequest (CSR) is a file that contains a public/private key pair.
NOTE:
These certificates are also useful for automating application distribution processes regardless of the framework you use. For example, these certificates are used in App Center and you can use fremework such as Xamarin, .NET MAUI, React Native, among others.
To learn more about certificates and how they work in the Apple App Store, visit the iOS Dev Center and see Apple’s official documentation.
Before you start
- You need a Mac to generate the certificates.
- Make sure you sign up for an iOS developer account.
- Make sure you’ve created an app ID in the iOS developer portal.
How to create a Distribution Certificate
Creating the Signing Certificate Request
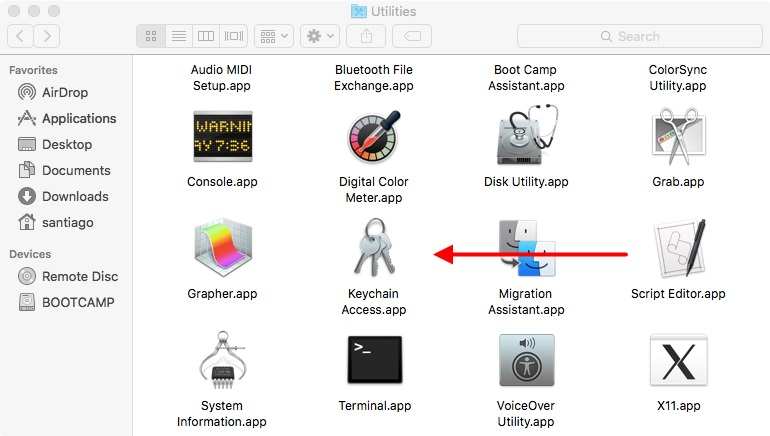
- On your Mac, go to the Applications > Utilities folder and open Keychain Access. You can also use the search engine and directly type “Keychain Access”.
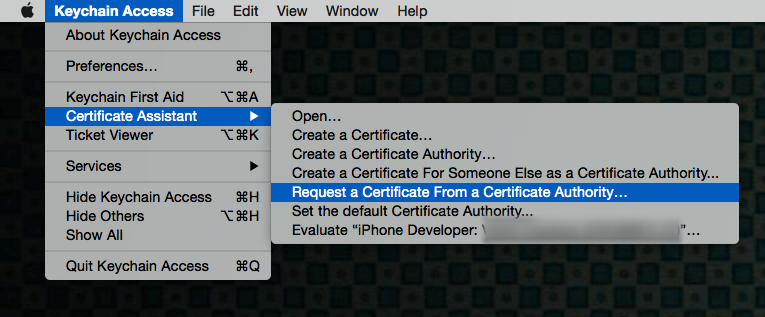
- Go to Keychain Access > Certificate Wizard > Request a certificate from a certificate authority.
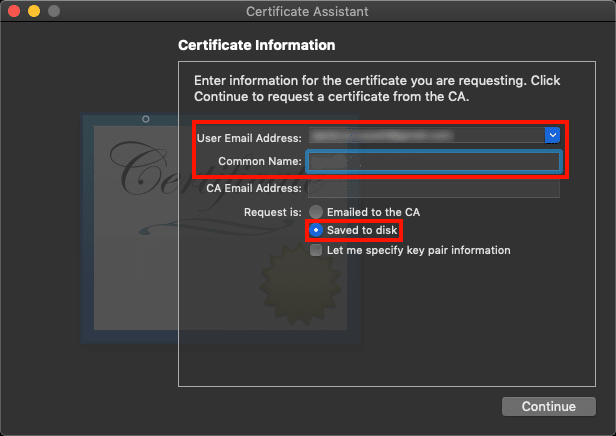
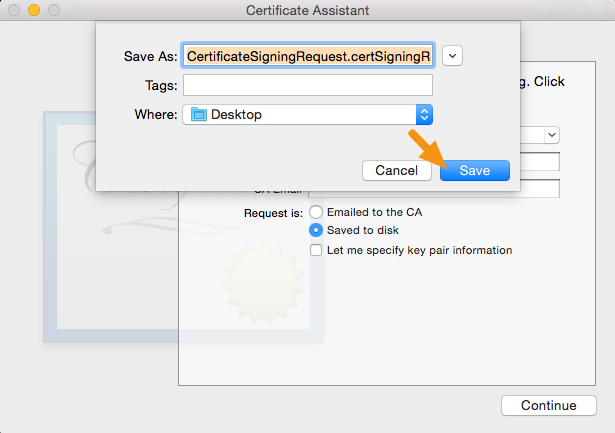
- Fill in the information window Certificate Information as specified below and click “Continue”.
- In the User email address field, enter the email address that you want to identify with this certificate.
- In the Common Name field, type your name.
- In the Request group, click on the “Save to disk” option
- Save the file to your hard drive.
The wizard creates a certificate signing request (CSR) file that contains a public/private key pair.
Creating the Distribution Certificate
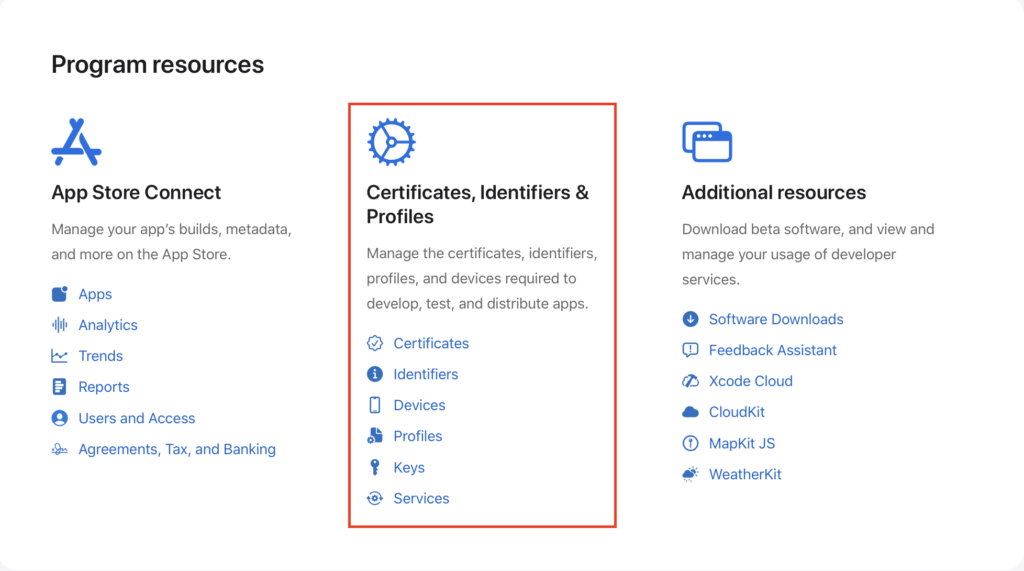
- Sign in to your iOS Developer Console https://developer.apple.com
- Click on “Certificates, identifiers and profiles”.
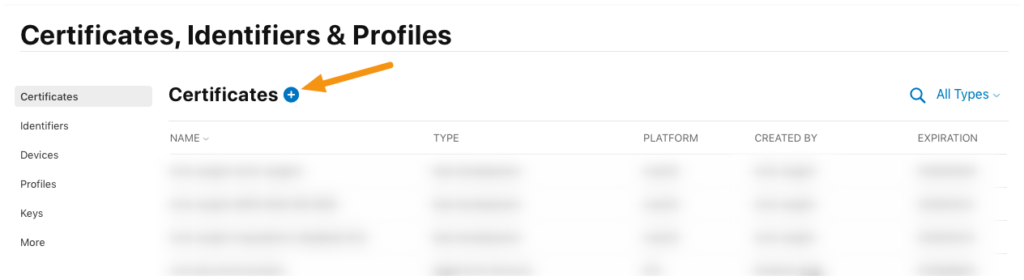
- Go to Certificates and click the “+” button to add a new certificate.
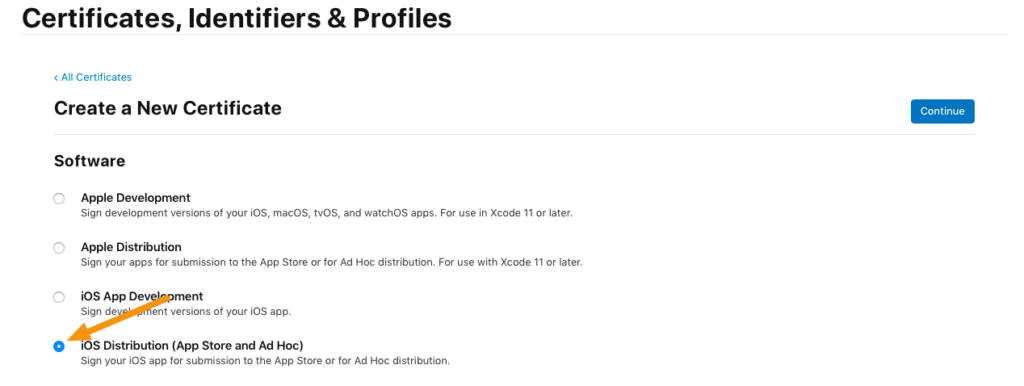
- Select “App Store and Ad Hoc” from the production options and click “Continue”.
NOTE:
To use your certificates, you must have the intermediate signing certificate in your OS X system keychain. Xcode installs it automatically. However, if you need to reinstall the intermediate signing certificate, click the link at the bottom of the page.
- Click “Continue” again.
- Since you already created your CSR file in the previous steps, you don’t need to create another one.
- Click “Choose File” and select the CSR file you created earlier and then click “Continue”.
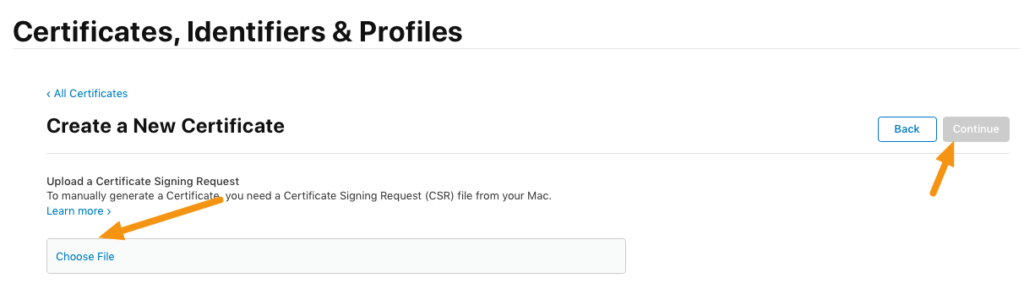
- Click the “Download” button to download a .cer file to your machine and then click “Done”.

- Double-click the .cer file to install it under Keychain Access.
It will have the name “iPhone Distribution <first name> <last name>” and will expire one year from the date of creation.
Exporting a distribution certificate as a .p12 file
A .p12 file is a special-formatted, encrypted file that contains the distribution certificate. It’s embedded in your app when you build it. iTunes Connect checks this file when you submit an app and will only accept the app if it contains a .p12 file that matches what you’ve set up in your iTunes Connect account.
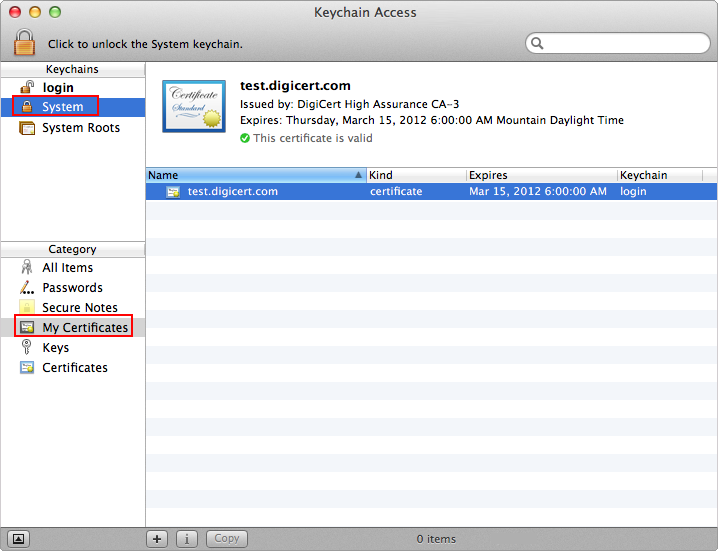
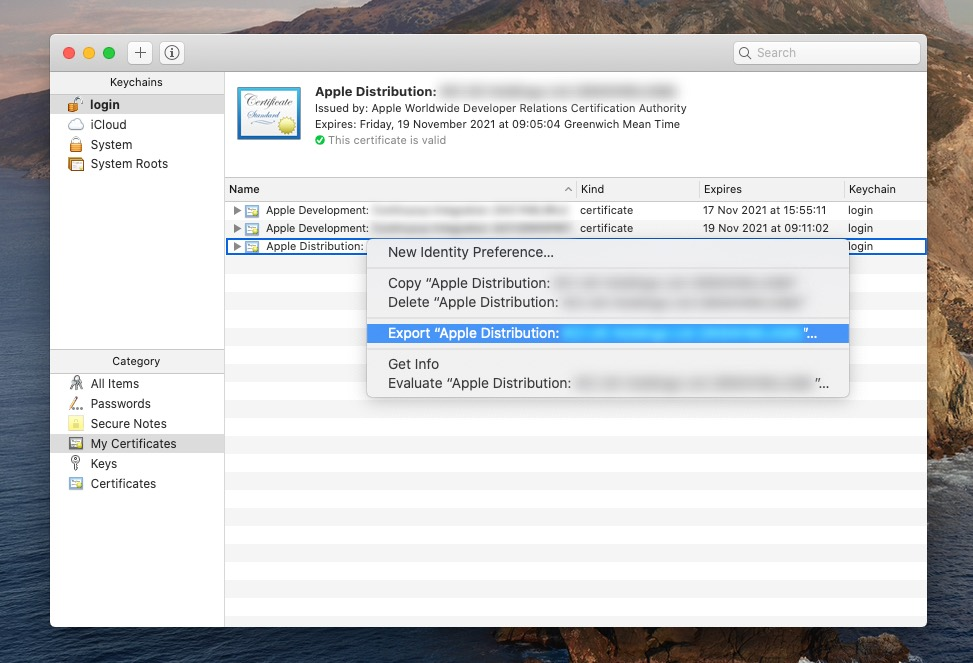
- On your Mac, launch Keychain Access, select the certificate entry, and right-click on it to select “Export”.
All the certificates you have installed will be in the “login” keychain (Label 1) in the “My certificates” category (Label 2).
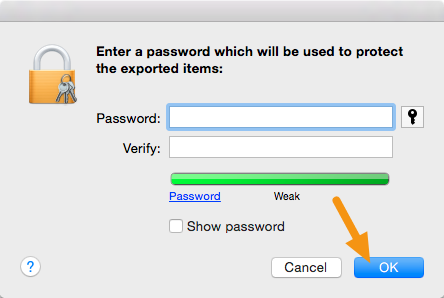
- In the window that appears, make sure the file format is set to “Personal Information Exchange (.p12)” and click “Save” to save it to your machine.
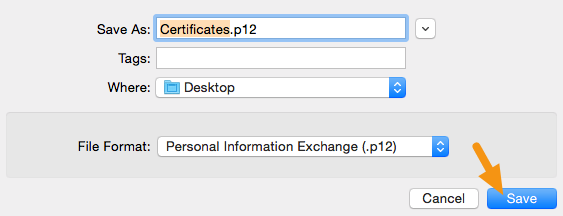
- When prompted for a password, you can leave it blank or assign one, then click “OK”.
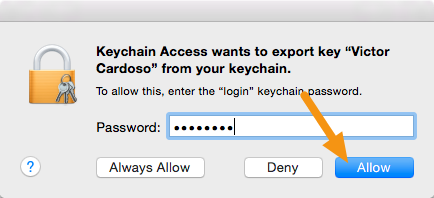
- When prompted for the computer password, enter it and click “Allow”.
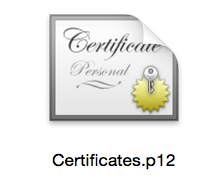
- Your .p12 file will be saved to the specified location.
Provisioning profiles (.mobileprovision)
Uploading an app to App Store Connect requires an app registration registered with an explicit app ID. You can create your own App Store provisioning profile with an explicit app ID to use when you upload your app to App Store Connect.
Creating a provisioning profile
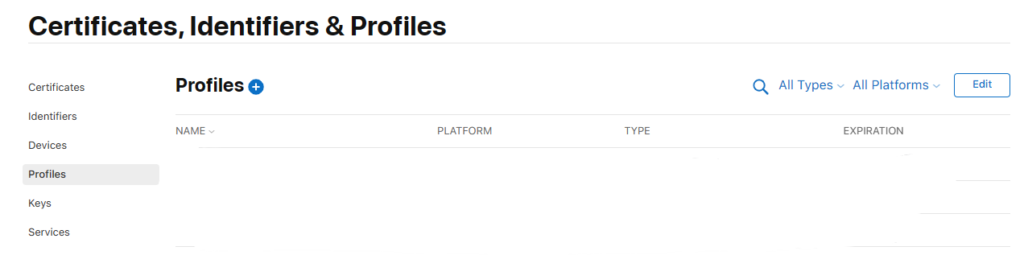
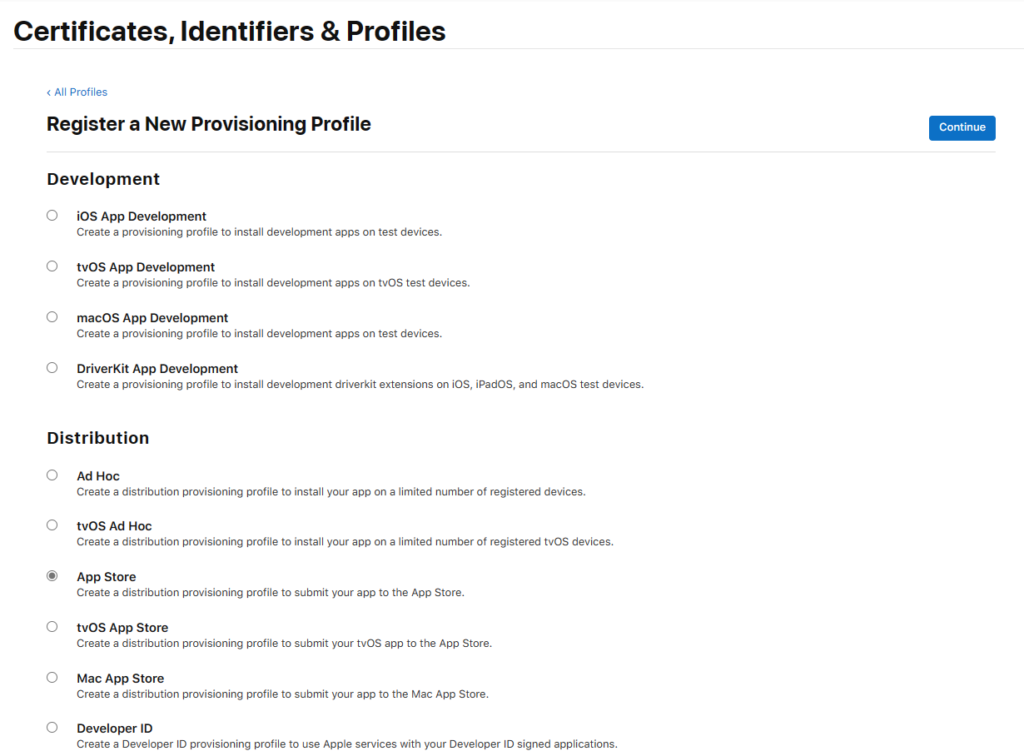
- Under Certificates, IDs, and Profiles, click Profiles in the sidebar, then click the Add (+) button in the top left.
- Under Distribution, select an App Store distribution profile for your platform, then click Continue.
- App Store: For iOS and watchOS apps and App Clips.
- tvOS App Store: For tvOS apps.
- Mac App Store: For macOS apps, including those configured with Mac Catalyst.
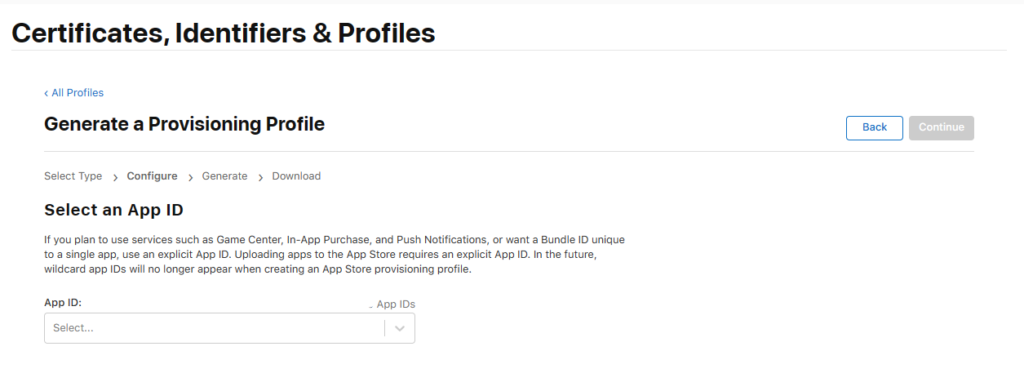
- Choose the app ID you used for development (the app ID that matches your package ID) from the App ID pop-up menu, then click Continue.
If you use autosignature during development, choose one of the following:- XC Wildcard if it is the only option.
- The explicit application ID managed by Xcode that starts with XC and contains its package ID.
- The ID of the app you registered and matches your package ID.
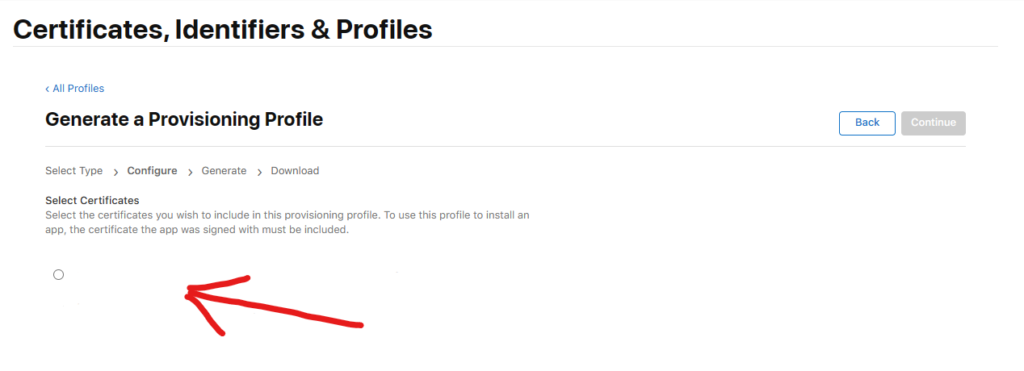
- Select your distribution certificate, then click Continue.
An App Store provisioning profile contains a single distribution certificate.
- Enter a profile name, then click Generate.
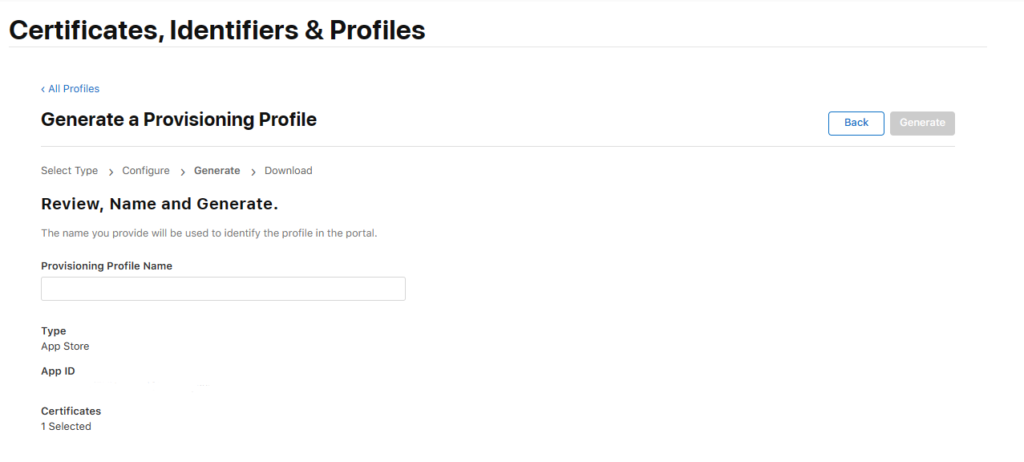
- Click Download.
Conclusion
Creating and using distribution certificates, .p12 files, and provisioning profiles are essential elements for publishing and distributing apps to the Apple App Store. This article gives you a detailed and easy-to-follow guide to creating and using these elements effectively. Now, you’re ready to publish and distribute your iOS apps with confidence and success.
Good luck in your app development!