Learn how to use the CollectionView within a ScrollView in Xamarin.Forms. Sometimes we want to develop some functionalities that need different data contexts to be displayed within the same page and this can be achieved with a TemplateSelector if the data source is the same, but if it is not the same how we can do it?.
In this article, I will share with you custom control of the CollectionView that you can use directly in your projects or simply adapt it to your needs if that’s what you want.
CollectionView inside a ScrollView
Before showing you the control and how it works I need you to understand that it is not always highly recommended to put a CollectionView inside a ScrollView simply because both controls have scrolling and when using them together you can have unwanted User Experiences (UX).
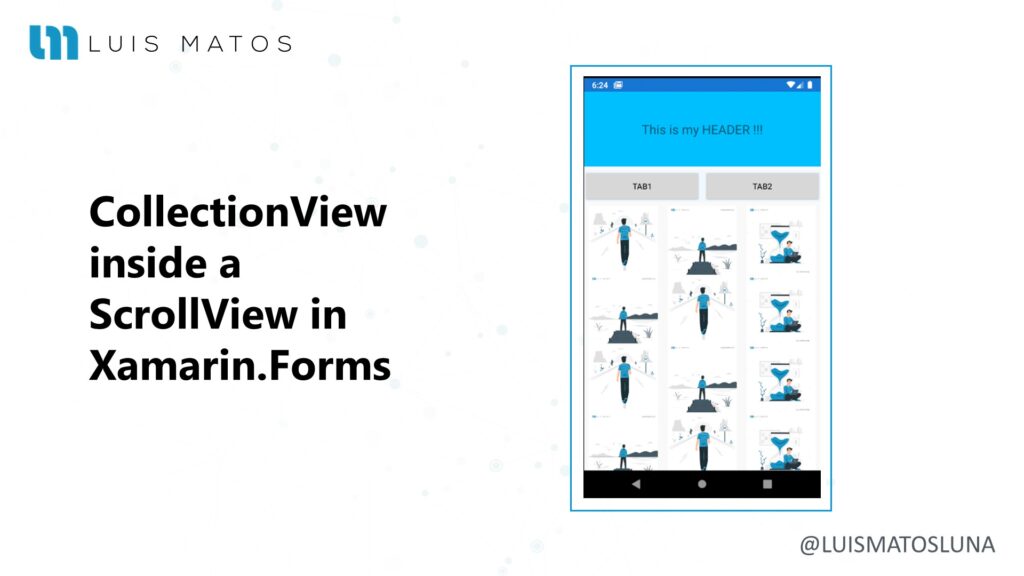
Here’s an example of how a CollectionView behaves within a ScrollView:

CollectionView within a ScrollVIew.
Note: The displayed header does not belong to the CollectionView.
If you look good, until the CollectionView reaches the bottom of the list of items it handles, the ScrollView does not scroll unless you scroll from the header which does not belong to the CollectionView.
Why use a CollectionView within a ScrollView?
I’ll show you a particular and very popular case for you to understand. This is the Instagram user page. Let’s go see it:
If you look, below the stories, are the TabsViews that allow us to visualize different types of data and contexts.
Note: Previously, Instagram displayed in tabsView the type of view you wanted to see on the page either Grid or List. This behavior in Xamarin.Forms can be achieved with a TemplateSelector as long as the data context is the same.
Here the challenge is that the CollectionView is not very extensible to say, and does not allow you to achieve this functionality in a natural way, at least in what you can investigate.
That’s why I decided to create the next control.
Custom CollectionView
Control really is a very simple thing but it applies some powerful concepts. What we will do will be disable the scroll of the in order to use only the scroll of the . For this we only have to calculate the total height of all items and set that height to .CollectionView ScrollViewCollectionView
To achieve this we have defined some default parameters as:
- ScrollView, of type
ScroolView, receives the instance of the ScrollView parent and has a default value ofnull. - RowHeigt, of type
int, receives the predefined height of the rows that it is using the control, default0.
With these parameters we can have one CustomCollactionView as follows:
    public class CustomCollectionView : CollectionView
    {
...
        [TypeConverter(typeof(ReferenceTypeConverter))]
        public ScrollView ScrollView
        {
            set
            {
                _scrollView = value;
                _scrollView.Scrolled += _scrollView_Scrolled;
            }
        }
...
        private void _scrollView_Scrolled(object sender, ScrolledEventArgs e)
        {
            double scrollingSpace = _scrollView.ContentSize.Height - _scrollView.Height;
            if (scrollingSpace <= e.ScrollY)
            {
                // Touched bottom view
                RemainingItemsThresholdReachedCommand?.Execute(RemainingItemsThresholdReachedCommandParameter);
            }
        }

        private void UpdateHeight()
        {
            if(_columns  == 0)
            {
                if (ItemsLayout is GridItemsLayout layout)
                    _columns = layout.Span;
                else
                    _columns = 1;
            }

            if (_rowHeigt > 0)
                HeightRequest = (_rowHeigt * _rowCount) / _columns;
        }

        protected override void OnChildAdded(Element child)
        {
            base.OnChildAdded(child);
            UpdateHeight();
        }

        protected override void OnChildRemoved(Element child, int oldLogicalIndex)
        {
            base.OnChildRemoved(child, oldLogicalIndex);
            UpdateHeight();
        }
    }
Each time it is added or deleted, an item will update the height of the CollectionView. Similarly, if we touch the bottom of the ScrollView we will execute the RemainingItemsThresholdReachedCommand of the CollectinView to make sure that the behavior is the same in every way.
Once we have control, we can use it in our Xamarin Forms projects. Here’s an example in XAML:
...
    <ScrollView x:Name="myScrollView">
        <StackLayout>

            <!-- YOURS CONTROLS GOES HERE -->

            <ctrls:CustomCollectionView
                ItemSizingStrategy="MeasureFirstItem"
                ItemsLayout="VerticalGrid, 3"
                ItemsSource="{Binding Items}"
                RowHeigt="120"
                ScrollView="myScrollView">

                <CollectionView.ItemTemplate>
                    <DataTemplate>
                        ...
                    </DataTemplate>
                </CollectionView.ItemTemplate>
            </ctrls:CustomCollectionView>

        </StackLayout>
    </ScrollView>
...
With this, we can get behavior similar to that of the Instagram profile page. Let’s look at an example:

CollectionView within a ScrollVIew.
Note: The displayed header does not belong to the CollectionView.
Conclusion
As you can see this is very simple but powerful control, which I bet more than one can help. The implementation is quite simple and very simple to understand.
Note: There is a limitation. The control does not work with rows that have dynamic heights, because we are calculating predefined fields.
I hope this article is useful, and nothing let me know on the networks that they really like these kinds of articles and I will do my best to give them the best of the best.